Sunday, April 30, 2023

Hotel Laundry Newsletter March 2023


Wednesday, April 26, 2023

You Have to Clean Lint Traps!

I went to an apartment laundry room for a meeting with a landlord, and then to a laundromat to meet the owner because both of them said their dryers weren't working well.
First thing I found upon opening the lint drawers at both locations was this...


I won't indicate which ones were at the apartment or the laundromat, but you get the idea that both were filthy!


The cleaner of the laundromat was there and said he cleaned the lint traps the previous day. 
Was the cleaner telling the truth?


In my opinion (I'm going to quote Colonel Potter from MASH)
"Horse Hockey!"

By not cleaning lint traps you:
  • increase the chances of fire
  • your dryers work harder using more gas and electricity cost you more money
  • dryers have to work harder to move air around decreasing their efficiency and life span
  • customers have to wait longer for dry clothes
  • customers have to spend more money
You have to clean your lint traps every day!
The last impression people have of your laundry room is from the dryers. If they don't work well you just lost a customer! How much money over a years time have left with them?
Can you afford that?
Ev
A Heck of A Nice Guy


Wednesday, April 19, 2023

Screws in Dryers


Have you ever heard a loud scraping sound when your dryers are running?
If you have heard a pocket scraping, one of the things that could be causing it is a screw that got stuck in the circulation holes in the basket/tub.

People leave things in their pockets and even if they try and check them screws sometimes get stuck in the fabric of the pockets and fall out during tumbling.
The screw scrapes on the shild piece of metal that surrounds the basket and bangs into the leading edge of the pocket where the lint tray sits.

You need to remove these screws, or any other objects sticking through the holes, as soon as they are discovered:
  • eliminates the loud noise that bothers customers and makes them wonder what is wrong with the dryer
  • screws and other objects can snag on the edge of the lint drawer, lint drawer seating area, or the edge of the shield around the basket. These edges can bend or break which causes more noise as the basket rotates over that spot causing noise
  • the screw and other object can snag customers clothes causing damage
  • the hole where the screw gets stuck in gets broken or warped and that can snag a customers clothes causing damage
Getting the screws out can be really simple. Often times just rotate the drum in the opposite direction and the screw will fall so the head is flat on the inside of the basket making it easy to grab with your finger nails.

Sometimes you will need a needle nose pliers to pull or wrench the screw out (be sure not to damage the hole the screw is going through).

You can also rotate the basket sometimes so the screw is inside the lint drawer area (take the lint drawer out) and you can push the screw upwards with a pliers or hammer and that will pop it out.


Screws can be large or small


Screws can get stuck under the baffles inside the dryer


Damage to the leading edge of the metal shield around the basket causes more noise and can damage the basket and customers clothes


Ev
A Heck of A Nice Guy

Wednesday, April 12, 2023

Venting for Dryers

I received an email from someone who was looking into dryers.
They wanted to know how venting works.
Since I wrote a long response, I decided to publish it here.
This is basic venting 101 for any laundry room or laundromat.
For more absolute specifics, take my information to your HVAC company to double check for your specific building.


Good morning Everet!
How the venting through the outside wall should go for your dryer vents. And also how the intake for fresh air should be cut into that wall. Placement, size, etc...
Thank you very much!


(Everet response)
Here is another long answer email.
I know everyone hates math, but I had to include it for this one.
Feel free to give me a call for more explanations on this.
There is make up air and exhaust air.

As for makeup air the rule of thumb is 1sq inch of make up air per 1,000 BTUs for the dryer.
Lets pretend a 30lb stack dryer is 144,000 BTUs and 
it is 190,000 BTUs for 50lb stack dryers.
You want to install three of the 30lb stack dryers and four of the 50lb stack dryers.
How big of an opening do you need for make up air?
For the 35lb dryers:
144,000 BTUs x 3 stacks = 432,000 BTUs
432,000 BTUs/1,000 BTUs =432 BTUs x 1sq inch =432sq in of make up air
To get the square of something it is the Length x Width
Pick standard number for width (lets say 24 inches but it can be whatever you want)
432sq inch/24 inches = 18 inches
So the make up air opening needed is 18 inches by 24 inches for the three 35lb stack dryers. More air is better so I like to go a little bigger so say 24 inches by 24 inches. 

For the 50lb dryers
190,000 BTUs x 4 stacks = 760,000 BTUs
760,000 BTUs/1,000 BTUs = 760 BTUs x 1 sq inch = 760 sq in of make up air needed for the four 50lb stacks
760 sq inch/24 inches = 31.66 inches (round to 32 inches)
Opening needed 32 inches by 24 inch or to go a little bigger
36 inches by 30 inches. For bigger dryers I like to add a little extra.

The larger the dryer the more air it needs.
The numbers above are minimums and general guidelines.
Your specific dryers are going to be different so check the labels.

For exhaust air are you planning to have the dryers vented individually or run the exhaust into a common duct and then the duct goes outside?
Pretend the dryer exhaust duct is 8 inches, What size hole in the wall do you need?

1. The dryer exhaust venting in this case is 8 inches in diameter. Typically the hole in the wall is just a smidge over 8 inches in diameter and that accounts for the width of the sheet metal of the duct going out of the wall. Usually there is a little vent hood over the outside opening to keep wind, rain, birds out. It is best if each dryer can be vented individually, however that isn't always possible. So if each dryer cannot have its own exhaust opening...

2. The dryer duct work inside the building connects to a common "box" of "take off" and that take off covers a hole in the wall roughly the same size. Up to four dryers (preferably less) have the exhaust venting connected to this take off. No matter how many connections to the take off, be sure to stagger or offset the holes cut into the takeoff a little bit so air coming out of dryer A doesn't get blown back down into the exhaust of dryer B.
The more dryers you vent into the take off, the larger in diameter the takeoff and hole in the wall has to be to move the air through it

Exhaust air vents should be above the height of the make up air intakes. You don't want exhaust vents to be below make up air otherwise your dryers will be sucking in exhaust air. Exhaust air vents usually have some sort of vent cover to keep rain and wind and animals out.
Make up air intakes sometimes do and sometimes if it is a bigger opening, they are just flush with the side of the building with no hood over them. Once you put louvers or some sort of covering over the air intake you need to make your intake hole bigger to accommodate for the air blockage caused by the louvers. Check with your HVAC contractor for local codes.
Usually they want to see two openings for make up air behind the dryer line (in this case one that is 24in x 24in and one that is 36inx 30in but some will let you have one big opening.

The make up air vents can be lower in the wall closer to the ground (just don't make them level with the ground because snow will pile up and block air), mid way up the wall, or in the ceiling of the area behind the dryers, wherever you want them to be within code. You can put louvers over the make up air opening that you can close to block out the air on the coldest of days, but when you do that you need a bigger opening because louvers can block up to 50% of the air depending on what you use. Your HVAC company can suggest several types. There are systems that when your dryers are running the louvers open and close when the dryers are idle saving you some of the cold air behind the dryers.

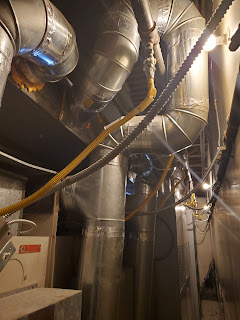
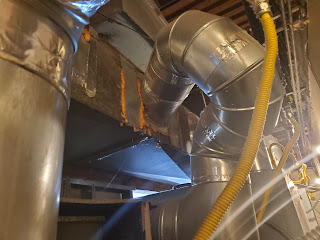
Notice all of the combination of 45 degree and 90 degree elbows in the vent lines in the pictures below. When installing dryers try to keep the venting as straight as possible coming out of the dryer to the outside of the building. Every elbow that is included you lose efficiency of your dryers and your dryers have to work harder and it takes longer for items to dry.


I hope this helps your understanding of venting and planning for your new or replacement dryers.
Ev
A Heck of A Nice Guy

Wednesday, April 5, 2023

Everet's Laundromat Newsletter March 2023


Wednesday, March 29, 2023

Huebsch & Speed Queen Model Number Definitions

 If you've ever owned a Huebsch or Speed Queen large washer or dryer, the model number can tell you a lot of information but can be confusing. Here is what the different letters and numbers mean:


Ref
PartDescriptionComments
1-Product Family

SC
HC

2-Market Approvals

A (Australia ICE)
D (Brazil IEC)
G (International)
H (China-ROHS IEC)
J (Japan-PSE IEC)
K (Korea IEC)
L (Thailand-TISI IEC)
T (North America)
U (International CE/EAC)

3-Capacity (Dry Weight in Pounds)

080
100

4-Control

V

5-Actuation

L (Central Pay)
X (Prep for Coin)
Y (Prep for Card)
P (Fob)
C (Single Coin)
D (Dual Coin)
E (Electronic Drop)
T (Token)
F (Single Coin + CD Lock and Key)
Q (Dual Coin + CD Lock and Key)
H (Electronic Drop + CD Lock and Key)
V (Token + CD Lock and Key)

6-Coin Meter

0 (Standard)
1 (CD Lock and Key)

7-Speed

F (F-Speed)
V (V-Speed)

8-Voltage

B (120/60/1)
W (200-240/50/1/3)
Y (200-240/60/1/3)
X (200-240/50-60/1/3)
Q (200-240/50-60/3)
P (380-415/50-60/3)
N (440-480/50-60/3)

9-Panel

B (Chrome Door)
C (Chrome Door)
U (Vinyl)
1 (Stainless Steel Side)

10-Design

5

11-Heat

0 (Standard)
D (Steam)
E (Electric Heat)
P (Prep for Steam)

12-Features and Options


Ev
A Heck of A Nice Guy

Wednesday, March 22, 2023

5 MORE Guest Laundry Repairs Hotel Owners & Managers Should Know

Having broken laundry equipment costs your hotel money in terms of revenue generated and in repair expenses. I wrote a previous article about five repairs that you can do to save money and keep your guests happy.
5-guest-laundry-repairs-hotel-owners.html

Below are five MORE quick fixes that you or someone on your staff should be able to handle:


6. Fix a broken door handle, door trim ring, door window
I know some of you are saying there are three things in this item rather than one.
In reality on todays frontloading washers all of these parts are replaced on the door with usually the same set of screws on the backside of the door


7. Replace a broken soap tray or tray parts
Soap trays often have dividers that break, drawer stops and retainer clips that break off causing the drawer to be able to be pulled all the way out, seals that go missing or get ripped off

8. Replace a broken door hook
Own a small chassis front loading washer? At some point a customer will have an unbalanced load in it and the door won’t open causing the customer to wrench the door open somehow to get their clothes out. The door hook is the little plastic piece that fits inside the door latch. Don’t worry the tabs are supposed to break off. Better to have to repair a small door hook than a whole door!

9. Replace a water valve in small chassis washers
A lot of screws and hoses need to be moved usually to get to these but another simple repair.

10. Clean the lint screens in the dryers
Besides vacuuming the lint traps and wiping them out daily I’m talking about cleaning the gunk out of the holes in the screen that gets stuck in there. There are several ways to do this and several cleaners that do a good job.

These are the basic items that if you can fix, it will save you a lot of money on service calls and lost revenue due to machines being down for a few days. You can find out how to do these fixes by looking at your favorite blog (like this one!), or watch online videos about on various channels or the manufacturer website.

Once you fix these different items, don’t get too cocky and think you are a major league repair technician. When you start thinking that way is when you will try and do a major repair and either won’t be able to figure it out and need to call a service tech anyways, or you’ll do something dumb and fry a UI board because you didn’t turn the power off. Trust me. I've done both of those things.

Ev
A Heck of A Nice Guy

Wednesday, March 15, 2023

5 Guest Laundry Repairs Hotel Owners & Managers Should be Able to Fix

5 Guest Laundry Repairs Hotel Owners & Managers Should be Able to Fix:


Owning and managing hotels can be a constant juggling act of dealing with needs of guests and staff, while staying in budget for all expenses.
Sometimes time is stretch thin that as manager and owner you don't have time to fix laundry equipment. So you call a technician and usually these days have to wait for them to show up a few days later and then need to wait a few more days for the parts to come in, and then a few days for the tech to return. So your laundry equipment might be down for several days to a couple of weeks. While the guest laundry may or may not be a big money maker for your hotel, the invoices for the repairs are a definite drain on hotel cash flow. By fixing a few simple things yourself you can save the money on repair techs and get machines back up and running to make the hotel money and keep guests happy.

Within the first couple years a manager or an owner will probably run into most of these things. This list isn't all inclusive. We could probably expand the list to 100 things an owner needs to know how to repair. This list only applies to guest laundry. I'll deal with staff laundry equipment in a different article.

Here are five quick fixes you or your staff should be able to do:

1. Clearing coin jams
At some point early on in your tenure someone will put a bent quarter in your machine, use a foreign coin, put nickels dimes and pennies into the coin slot, or feed the quarters too fast and not wait for the coins to drop into the coin box. Maybe the coin slides will just be dirty. Whatever the reason is you will have a machine that won’t start because customers can’t put quarters into it. Learn the quick ways to dislodge these stuck coins and the proper way to clear the jam

2. Clean out the drain pump Small chassis washers will often get socks, coins, hair clips, and other junk that goes down the hose from the tub to the pump. Learn how to clear this debris otherwise your washers won’t drain and will leave the clothes soaking wet.


3. Change broken selection buttons
Customers can’t select a cycle or press the “start” button they can’t wash their clothes and you can’t make money


4. Replace a door hinge
Door hinges on small chassis washers are easy to fix. Take the old one off and put the new one on. 5-10 minute repair keeps the washer running and making money. Repairing a hinge on a large chassis washer doesn’t have to be done very often so you will be forgiven if that takes you longer to change one the first time


5. Replace a User Interface (UI) board
Most UI boards are modular units and can be swapped out easily after you get though the usual myriad of screws to get to them. A little tricky because you want to remember to turn the power off first. I know most people don’t turn the power off to the machine completely, however I’ve inadvertently shorted a board because I didn’t turn off the power. I’ll admit I don’t always turn the power off on a small chassis, however on a large chassis I always turn it off.

As I said there are lots more simple fixes that can be done.
These are the basic items that if you can fix, it will save you a lot of money on service calls and lost revenue due to machines being down for a few days. I didn’t tell you the diagnostic symptoms or how to fix these things. They are all things you can reason out or watch online videos about. To fix a lot of the problems above you can take a look at my blog to find how to do these. You can also search your favorite online video channel or the manufacturer website as they often have videos on how to do these repairs. Check your manual for troubleshooting and repair tips too.

Until next time...it all comes out in the Washtub!
Ev
A Heck of A Nice Guy